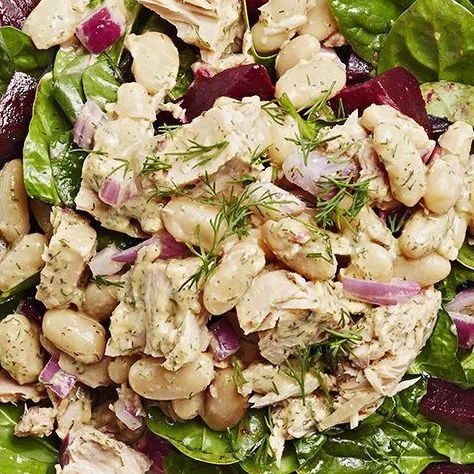
Tuna and Cannellini Bean Salad Recipe
Tuna and cannellini bean salad is a delicious and nutritious dish that combines flavorful ingredients for a quick meal. This salad is packed with protein and is incredibly easy to make.
Why Make This Recipe
Choosing to prepare tuna and cannellini bean salad is a great option for several reasons:
- Healthy Meal: It is high in protein and fiber.
- Quick to Prepare: This salad can be whipped up in under 15 minutes.
- Versatile Ingredients: You can customize it with items you have on hand.
How to Make Tuna and Cannellini Bean Salad
Creating this refreshing tuna and cannellini bean salad is straightforward. Follow these simple steps to bring this dish to life.
Ingredients:
- Canned tuna
- Cannellini beans
- Red onion
- Fresh dill
- Lemon
- Pepper
- Dijon mustard
- Spinach
- Canned beets
Directions:
- In a mixing bowl, combine canned tuna, cannellini beans, chopped red onion, and dill.
- In a separate bowl, whisk together lemon juice, pepper, and Dijon mustard to make the dressing.
- Pour the dressing over the tuna mixture and toss to combine.
- Serve the tuna salad over a bed of spinach and top with slices of canned beets.
How to Serve Tuna and Cannellini Bean Salad
Tuna and cannellini bean salad can be served in various ways:
- As a main dish over a bed of fresh greens.
- In a sandwich or wrap.
- As a side dish alongside grilled meats.
How to Store Tuna and Cannellini Bean Salad
To keep your tuna and cannellini bean salad fresh:
- Refrigerate: Store in an airtight container in the fridge.
- Consume: Best eaten within 2-3 days for optimal freshness.
Tips to Make Tuna and Cannellini Bean Salad
Here are some tips for making the best tuna and cannellini bean salad:
- Fresh Ingredients: Use fresh herbs for enhanced flavor.
- Chill the Salad: Let it sit in the fridge for 30 minutes before serving for a cooler taste.
- Adjust the Dressing: Modify the amount of lemon or mustard to suit your taste.
Variation of Tuna and Cannellini Bean Salad
Feel free to experiment with different additions:
- Add cherry tomatoes for extra color.
- Include cucumbers for crunch.
- Substitute the spinach with arugula if you prefer a peppery flavor.
FAQs
Can I use fresh tuna instead of canned?
Yes, you can use cooked fresh tuna, but it will change the preparation time significantly.
Is this salad gluten-free?
Yes, tuna and cannellini bean salad is naturally gluten-free.
Where can I buy canned tuna?
You can buy it here.
Making tuna and cannellini bean salad is a simple and healthy choice for any meal! Enjoy your cooking adventure!

Spicy Nashville-Style Chicken Hoagies
Ingredients
For the Chicken
- 2 pounds chicken breast, thinly sliced Thighs can be used for juicier results.
- 2 tablespoons oil, divided Use for cooking the chicken.
- ¼ cup hot chicken seasoning or Nashville-style spice blend For seasoning the chicken.
For the Spicy Mayo
- ½ cup mayonnaise
- 1 tablespoon pickle brine
- 1 tablespoon chopped chipotles (optional for extra heat)
- 1 to 2 teaspoons seasoning blend (from above) To taste.
For Assembly
- 4 slices pepper jack cheese Cheddar, mozzarella, or American cheese can be swapped for a milder taste.
- Pickle slices for topping Add more for serving.
Instructions
Season the Chicken
- Place the sliced chicken breast in a bowl.
- Add one tablespoon of oil and about two tablespoons of the seasoning blend. Mix thoroughly until every piece is coated.
- For deeper flavor, cover and refrigerate for a few hours or overnight.
Make the Spicy Mayo
- In a small bowl, combine mayonnaise, pickle brine, chopped chipotles (if using), and one to two teaspoons of the seasoning blend.
- Stir well until smooth and creamy. Taste and adjust the flavor to your liking. Set aside.
Toast the Rolls
- Heat a griddle or large skillet over medium heat.
- Spread a thin layer of the spicy mayo on the cut sides of the hoagie rolls.
- Toast until golden and slightly crispy. Remove and set aside.
Cook the Chicken
- Add the remaining tablespoon of oil to the hot griddle.
- Spread the seasoned chicken pieces in a single layer and let them sear for about 3 minutes without stirring.
- Flip the chicken and continue cooking until almost done (internal temperature around 160°F).
Add Cheese and Finish
- Top the chicken with slices of pepper jack cheese and lower the heat slightly.
- Let the cheese melt and gently mix and chop the chicken until evenly coated with melted cheese.
Assemble the Hoagies
- Spread more spicy mayo inside each toasted roll.
- Spoon the cheesy chicken mixture onto the rolls, pile it high, and top with pickle slices.
- Sprinkle on a little extra seasoning if desired.
Serve
- Serve the sandwiches hot with fries, coleslaw, or a simple salad on the side.